
- Technical test
- Wind and terrain
- One or more
The compulsory figures and tricks form standardised tests. The importance of the different elements of those tests are reflected in the relative values given with each figure.
Not all figures or tricks are of the same degree of difficulty. Each figure or trick may be given an overall relative value (on a scale of 1 to 3; with 1 for the least difficult, 3 for the most difficult ones) In competition it is advised to select a combination of figures and tricks of average total value.
[at this point in time (2014-01-01) all figures and tricks are of considered to be of ‘average’ value.]
Of course wind is the all important element in kite flying! Its direction the basis for the coordinate-system in describing the compulsory figures and tricks.
The centre of the quarter sphere on which the kite is assumed to fly on is the standing point of the flyer; the direction of the wind is taken as the zero-degrees direction. This means the quarter sphere moves with the flyer, and turns with the wind!
This also means walking sideways while flying a figure to enlarge the wind-window is of no use, because description and diagram will specify a certain angle the lines have to make with the wind-direction, not a specific wind-window place or size! It demands that if in a figure the kite should be at >45 the lines have to make an angle of 45° with the direction of the wind, even if the figure was already flown “large enough”!
The terrain sets the horizontal plane. Well, in theory, since no field will be exactly horizontal! For most figures that is not important, with two exceptions:
if a horizontal line is to be flown at a certain height, that height is taken from the highest point “under” the quarter sphere a landing is done on the real terrain, of course, not on a theoretical horizontal plane.
[the lower edge of the quarter sphere in the diagrams is at the ‘kite-nose’ height, not on the ground, since lines on the diagrams depict the flying path of the nose of the kite!]
For pair and teams there actually exists -of course- more than one quarter sphere. To put all of those in a diagram would be very confusing, so just one quarter sphere is drawn. If, however, all kites in a pair or team fly similar figures (like two eights or circles) the diagram is split to make that clearer.
In general the distance between flyers on the ground is not important for the figures; the distance between the kites should be as described, as should be the angle between lines and wind-direction for all kites, especially for the outermost ones.
All team figures are designed for a maximum of six kites/ team-members, in general only just three kite flying lines (or only the outermost kites) are depicted in the diagram, the other kites are assumed to be evenly spread between the outermost ones.
- co-ordinates
- lines
- grid
- descriptions
- diagram
- description
- size and place of compulsory figures
- timing
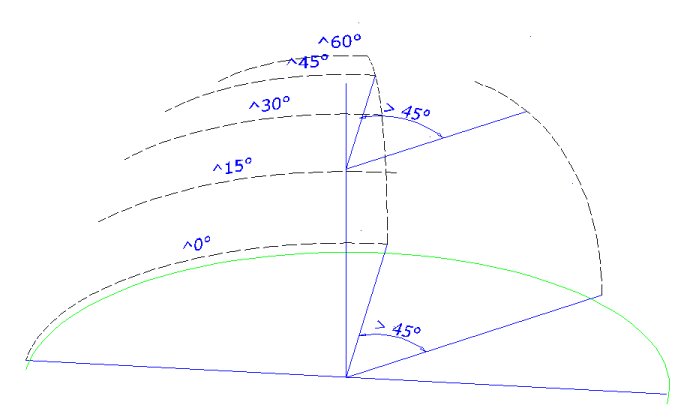
To describe the position of the kite(s) a system of co_ordinates will be used. One assumes the kite is flying on the surface of a quarter sphere, with it’s centre at the flyer’s standing point. The position of the kite is given in degrees (angles).
Straight forward (in the downwind direction) is defined as 0 (zero) degrees;
to the maximum right, perpendicular to the wind as 90° right (>90), the same to the left as 90° left (<90).
Straight above the flyer as 90° up (^90). The position of the kite can always be given by two numbers, each preceded by direction-signs.
The lowest horizontal line as depicted in the grid is at a height of 1.20 m above ground, since the definition of the place of a kite refers to the nose (or center) of the kite (see Grid drawings)
A straight horizontal line is defined as a flying a line of which the height (“up” position, fi ^30) does not change.
A straight vertical line as one of which the “side” direction does not change (fi >45) These are called “true” verticals.
[this means these vertical lines have one point in common: the point straight above the flyer!]
[a line that starts at ‘ground level’ and goes up in a way that looks vertical to a observer far behind the flyer, but of which in fact the “side” direction changes is called a “false” vertical]
Grid; angles
Horizontal lines (semi-circles) show the height in degrees
relative to the lowest level of the nose kite flying (and ground assumed to be horizontal).
Vertical lines or curves show the positions compared to the wind direction, also in
degrees
To translate and show the 3D positioning into a 2D grid the following steps have been taken:
in a flat front view of the quarter sphere both “true” vertical lines and horizontal lines at 15 degrees intervals are shown.
a second -isometric- view shows figures/ flying paths from a different view-point with the same 15-degree lines
The grid lines outside 60>; 60< and 60^ are omitted. (see also the “Standard grid” drawings)
Diagrams for tricks will be a combination of one of the above mentioned diagrams and a depiction of kite movements (sequence) See “Trick Standard”
all the diagrams of compulsory figures shall be done in a similar way, and shall clearly show (if applicable)
-the flying path of the nose (two line) or centre ( four line) of the kite
-the in and out points
-representations (both flat and a 3d representation) of the quarter sphere within which the figure is actually flown
[this is necessarily a simplification of reality, but should be clearly understandable]
-clear markings of distances, angles, directions of flight to be flown
(see “Standard grid”)
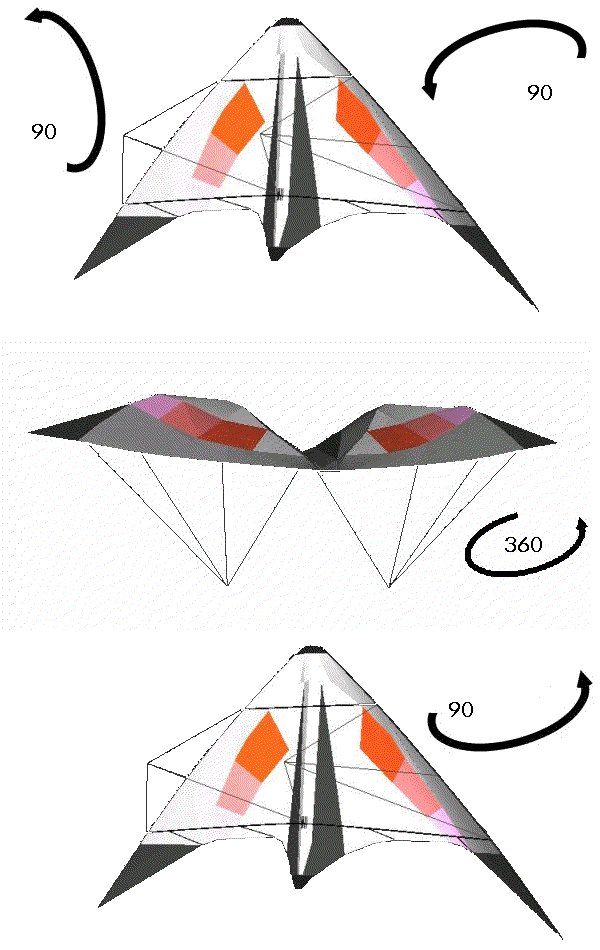
-clear markings of angles and rotations if done on the same place in the grid, depicted in a sequence of small kite-diagrams (used for tricks).
(see “Trick Standard”)
In the descriptions of the compulsory figures and tricks the following notation will be used to give the position of the kite. Lengths of flying paths as well as for example the radius of circles (measured horizontally) will be given in angles (instead of e.g. in metres; see “size”) This will be done by giving a number followed by a degree-symbol (°) like 15° or “deg”. Since it is not easy to visualize a length in degrees, this will be done if no other method can be used.
all descriptions shall clearly explain:
-position the starting and ending points of the figure in standard system of coordinates
-all matters of timing within the figure that can not be accurately shown in the diagrams.
-basic elements.
Those parts of the figure that together form that figure. Between two and five will be stated for each figure. Each of these elements contributes to the total score given; the relative values of these elements are given in the description.
flying all the basic elements (as stated in the description) perfectly will give a maximum score.
[Since figures are designed to test specific skills, these parts also form the bare essentials of that test. Not flying those parts means the competitor avoids being tested. In judging the compulsory and its integral basic elements the judges will take into consideration the “margins of error” [See Rules Book; “Procedures; Margins of error” for an explanation.]
With the given methods of describing and drawing the compulsory figures the size of the actually flown figure is depending of line-length, but the positions of the kite are the same for different line lengths (if defined in angles). So if for example a description says the kite should turn at >30,^15 this is the same for every line length.
[An earlier grid was based on a “plane” at the standing point of the flyer on which the figure was “projected”. It’s size was measured in percentages, with the edge at 53 deg. left, right and up. This meant the diagram and the description were based on that projection, not on the figure itself. It was more judge/ judging orientated than flyer-orientated.
The grid described here is based on what -or where- the figure is actually flown. But it has of course still the problem of translating 3D into 2D.]
Description of figures may state a maximum time in which to end a figure. [ingeneral only for four line figures]

Standard grid 3D
[black lines shown are the vertical and horizontal lines at 15 degrees intervals]

Standard grid Front
[ lines shown are the vertical and horizontal lines at 15 degrees intervals]
[Kites are “on scale”, for a line length of about 37.5 m for two-line kites; 20 m for four-line kites]
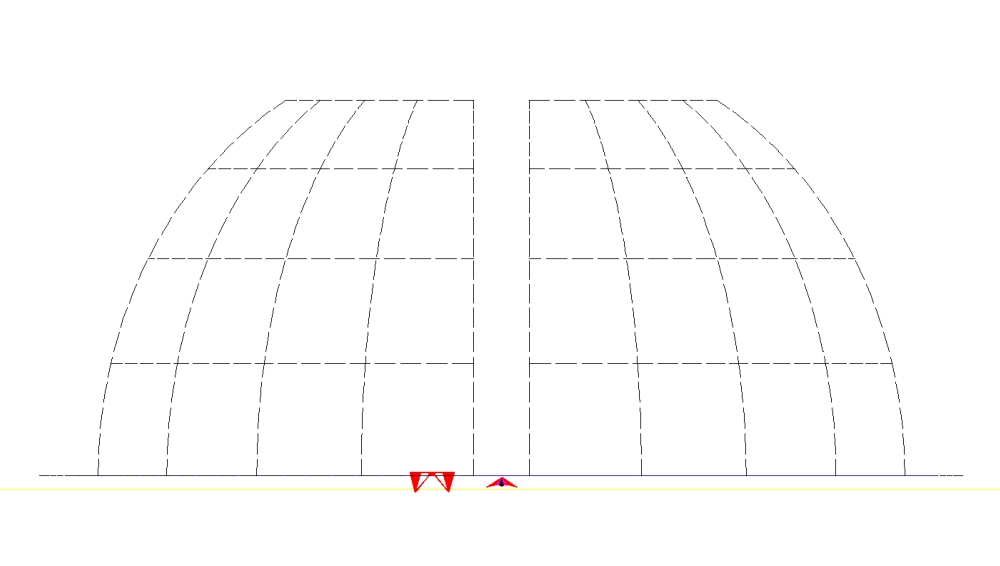
[ the gap between left and right half of the grid equals the -usual- distance between the first and sixth flyer]
List of Compusory Figures and Tricks
- Two Line Kite Figures
- Individual
- Pair
- Team
- Two Line Kite Tricks
- Individual
- Pair
- Team
- Four Line Kites Figures
- Individual
- Pair
- Team
- Four Line Kites Tricks
see this page for diagrams and descriptions
Square cuts
Stops
Launch, circle and land
Steps
Diamond over circle
Drop down axel
Looper
Split figure eight
Inverted eight with landing
Two squares
Circle and square
T-bone
Eight in a rectangle
Diamond in a triangle
Wigwams
Inverted eight with landing
Three squares
Meet again
Square and circle
Three circles
H
Double double U
Twist
Launch, circle and land
Knot
The cliff
Kiteflight
Cigar cutter
Pick up sticks
Graduated circles
The Basket
Inverted eight with landing
Knit one, purl one
Drop down axel
Square cuts
Rain
Aqualud
Team diamonds
Follow, flank up and square
Graduated circles
Arche de triomph
Mounts
Cascade
Fade
Turtle
Lazy Susan
540
Kombo
Cascade
Coin toss
Flapjack
Spike
Yoyo
Lewis
Reversed coin toss
Comete
Refuel
Oyster
Individual tricks, synchronized, either the same or mirrored
Refuel
Individual tricks, synchronized.
see this page for diagrams and descriptions
Chair
Arc circle
Lollypop
Follow the flow
Square and circle
Two down
Tipped square
Bicycle
Clockwork
Lazy eight
Bumps
Cradle
Tic tac
Looper
Poppies
Tandem
Qisses
Quadouble S
Meet again
Square dance
Switch
Arc circles
Three circles
Knot
Twist
Split pair square
Cigar cutter
Cradles
Iris
Cascade
Arc de triomphe
Follow the flow
Two down
Circles and slides
Tipped squares
Pick up sticks
Lollypops
The basket
Pivots
Solaris
Arc circles
Aqualud
Polygons
T.B.A.
Copy right: Hans JANSEN OP DE HAAR
It is allowed to copy the “Rules” book; the “Compulsory basics” book and both “Compulsory” books or parts of them under the condition this copy right note is always included.
Use for kite competitions is allowed, but only if the complete books are used.
Any change of these books is prohibited; additions are allowed (as mentioned in the Rules) provided it is made clear these additions are not part of the original books or texts.
Revised editions will be issued every two years; the next one is planned for 2017-01-02..
Suggestions and ideas are welcomed.
End copyright note.
hans at kitesonlines.org
TOP